Last week I used my scallop circle punch to make a neat little flower. I've had a few requests to do a tuorial, since I know my attempt at directions in the previous post left a lot to be desired!!! SO~ here it is...
SUPPLIES:
Scallop Circle Punch from SU! (any brand is okay, this is just the one I used here)
Glue or good adhesive
Patterned paper or cardstock
A really big brad
SUPPLIES:
Scallop Circle Punch from SU! (any brand is okay, this is just the one I used here)
Glue or good adhesive
Patterned paper or cardstock
A really big brad
STEP ONE - Punch out 4 scallop circles from the paper of your choice.
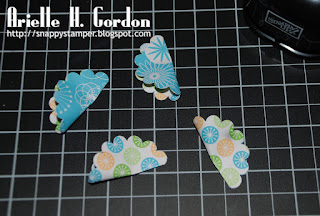
STEP THREE - Pinch the scallop in half - only where you applied the adhesive. Leave the other half unpinched.
STEP FOUR - Your scallops should now look like these.
STEP FIVE - Apply adhesive to the top of the scallop, on the piched side.
STEP SIX - Try to line the scalloped edges up, then stick your finger into the rounded, open side of the scallop and press it onto the glued, pinched side of the scallop.
STEP SEVEN - Repeat with the next "petal".

STEP EIGHT - Place the last "petal".
STEP NINE - Your flower should look like this.
STEP TEN - Insert a very large brad (or you could glue a button, but I think the brad holds better) into the center of your scallop flower!
YOU'RE DONE ~ How easy was that?
Thanks so much for stopping by!


2 comments:
great Thanks!
Wow great tutorial!!! Thanks.
Post a Comment